
Tackle That Laundry Monster: Fix Your Washing Machine!
Did you know that a malfunctioning washing machine can waste over 10,000 gallons of water annually? That’s a lot of laundry left undone! But don’t panic; you can tackle the problem yourself. Follow these 5 easy steps to become your own appliance repair expert and save both time and money!
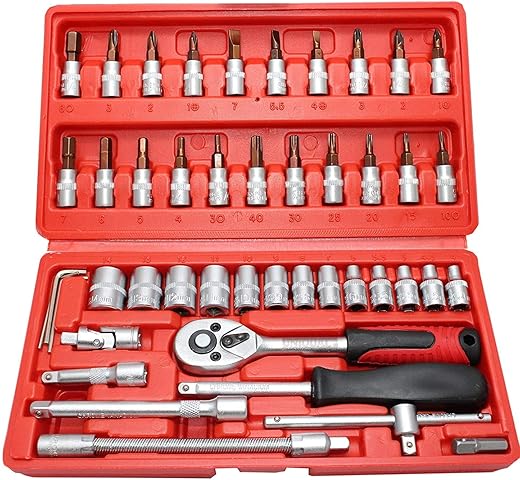
Get Ready: What You’ll Need to Fix Your Washer

Step 1: Identify the Problem
Is Your Washer Acting Up? Let’s Investigate!Start by diagnosing the issue. Listen for unusual noises, like grinding or banging, which could indicate a problem with the motor or drum. Check for leaks by inspecting the hoses and seals for any signs of water pooling. Observe any error codes displayed on your machine; these can pinpoint the exact issue. For example, a flashing “F2” code may signal a lid lock malfunction. Understanding these symptoms is crucial for effective repair—so take your time to gather as much information as possible before proceeding!

Step 2: Gather Your Tools
Don’t Just Wing It! Equip Yourself for Success!Prepare for your repair by collecting the necessary tools. Grab a set of screwdrivers (both Phillips and flathead) to handle different screws. Use pliers to grip or bend wires as needed. Obtain a multimeter to test electrical components and check for continuity. Having these tools within reach will streamline your work and prevent interruptions. For instance, if you need to quickly disconnect a wire, having pliers at the ready will save you time. Organize your workspace so each tool is easy to access when you need it!

Step 3: Unplug and Disassemble
Safety First! Time to Get Hands-On!Always unplug your washing machine before starting any repairs! This crucial safety step prevents electric shocks while you work. Refer to your user manual to disassemble essential parts, like the lid or back panel, by removing screws carefully. For example, if you’re inspecting the pump, locate and remove the drain hose first. Keep all screws and small parts organized in a container—this will save you from a frantic search during reassembly. As you take pieces apart, note their arrangement. This attention to detail makes reassembly a breeze later on!

Step 4: Replace Faulty Parts
The Heart of Repair: Swap Out the Bad for the Good!Inspect each identified broken component. Common culprits include worn-out belts, clogged hoses, or faulty pump filters. Remove the damaged parts by loosening screws or clips. For example, if you notice a frayed belt, replace it with a new one by aligning it with the pulleys. Install new parts by reversing the removal process; ensure everything fits snugly. Double-check connections on hoses or clamps to prevent leaks. Lastly, consult your user manual for any specific installation instructions. This meticulous replacement ensures your washer runs efficiently when you power it back on!

Step 5: Reassemble and Test
Put It Back Together and Let’s See It Work!Carefully reassemble your washing machine by replacing all panels and securing screws tightly. Reconnect any hoses and wires, ensuring they fit snugly in their designated spots. Once everything is in place, plug the machine back in and stand back. Run a test cycle—watch for unusual noises or leaks. If it functions smoothly, pat yourself on the back! You’ve just tackled a home repair like a pro. Celebrate your success by treating yourself to a fresh load of laundry, knowing you saved time and money with your DIY skills!

You Did It! Your Washing Machine Is Back in Action!
Congratulations! You’ve successfully repaired your washing machine at home using these easy steps. Embrace the joy of DIY and invest those savings into more enjoyable endeavors. Don’t forget to share your results and inspire others to tackle their repairs too!


Okay, I’m a total newbie when it comes to repairs. I managed to do steps 1-3, but got stuck at replacing parts. Do I need special tools for that?
You usually just need a screwdriver and maybe pliers. What part are you trying to replace?
Yeah, I was confused too! Just watch a quick YouTube video for your specific model; it helps a lot!
Just finished the repair and my washing machine is like new! 🎉 I was so nervous about tackling it myself, but this guide made it easy. Thanks a million! Anyone else feel accomplished after DIY repairs?
That’s awesome, Olivia! DIY is definitely rewarding. What was the issue?
So pumped for you! I just fixed mine last week too. It feels like we can take on the world now! 😂
Thanks for the tips! 🙏 But I feel like the parts can be so expensive, especially if you have to replace more than one. Any budget tips?
Look for used parts online, Mark! Sometimes you can find great deals.
Yeah, I found a local repair shop that sells used parts for a fraction of the price. Worth checking out!
Great guide, but can we talk about how messy it gets when you disassemble the washer? 😩 I had to clean up the floor afterward. Any tips on that?
Yeah, I totally relate! I kept finding lint everywhere! 😂 Might want to lay down some towels next time.
Good point, Jason! A drop cloth can help minimize the mess.
Awesome guide, but I think you could add more pics! Sometimes it’s hard to visualize the steps. Other than that, really helpful!
Agreed! Photos would make it even easier to follow along.
Thanks for the suggestion, Ava! We’ll try to include more visuals next time.
I just followed these steps to fix my old machine! It was making this weird noise, and I thought it was done for. But I found the issue in just a few minutes! Thanks for the guide! 🙌 Now I can finally do laundry without worrying. Anyone else had success with this?
Yup! Same here, saved me a ton of money. Just had to replace the belt.
So glad to hear it worked for you, Emily! What was the issue?
I had a total fail when I tried this. Thought I could handle it, but I ended up making it worse 😭. Guess I should stick to calling a pro! Anyone else have disasters?
Oh man, I’ve been there! It’s a learning process for sure. Just don’t give up!
Don’t feel bad, Derek! Sometimes things don’t go as planned. It happens to the best of us!
I appreciate the step-by-step, but I wish you included a troubleshooting section for the common issues! Mine was leaking, and I had no idea why until I Googled it. 😅 Still, great guide overall!
Good idea, Ben! I had the same problem and ended up replacing a seal. A troubleshooting section would definitely help!
Thanks for the feedback, Ben! We’ll consider adding a troubleshooting guide in the future.
I tried this, and it worked, but I had to YouTube a couple of steps. Maybe next time I’ll feel brave enough to do it all without extra help! 😂 Anyone else rely on videos?
Same here! I can’t do it without those videos! 😂 Makes it less scary.
Totally normal, Chris! Combining guides with videos often works best. What step gave you trouble?